Hello everyone, in this blog we will show you how to upload CSV file data in SAPUI5 and SAP Fiori Applications. Lets get started.
Prerequisites
You should have basic understanding on building SAPUI5 applications. To get all beginner tutorials please check here.
UI Controls used
- File Uploader from sap.ui.unified library
- Table and Button from sap.m library
Step-by-Step Procedure
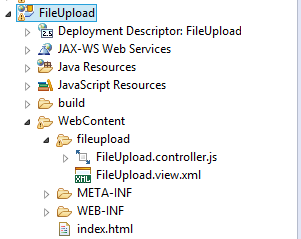
1. Create a SAPUI5 application in Eclipse IDE with one view and a controller. You project structure will look like below.
 2. Go to index.html and copy the below code.
<!DOCTYPE HTML>
<html>
	<head>
		<meta http-equiv="X-UA-Compatible" content="IE=edge">
		<meta http-equiv='Content-Type' content='text/html;charset=UTF-8'/>

		<script src="resources/sap-ui-core.js"
				id="sap-ui-bootstrap"
				data-sap-ui-libs="sap.m"
				data-sap-ui-theme="sap_bluecrystal">
		</script>
		<!-- only load the mobile lib "sap.m" and the "sap_bluecrystal" theme -->

		<script>
			sap.ui.localResources("fileupload");
			var app = new sap.m.App({initialPage:"idFileUpload1"});
			var page = sap.ui.view({id:"idFileUpload1",
                                                viewName:"fileupload.FileUpload",
                                                type:sap.ui.core.mvc.ViewType.XML});
			app.addPage(page);
			app.placeAt("content");
		</script>
	</head>
	<body class="sapUiBody" role="application">
		<div id="content"></div>
	</body>
</html>
3. Go to FileUpload.view.xml file and copy the below code to build the view.
<core:View xmlns:core="sap.ui.core" xmlns:mvc="sap.ui.core.mvc"
xmlns="sap.m" xmlns:u="sap.ui.unified" xmlns:l="sap.ui.layout.form"
controllerName="fileupload.FileUpload" xmlns:html="http://www.w3.org/1999/xhtml">
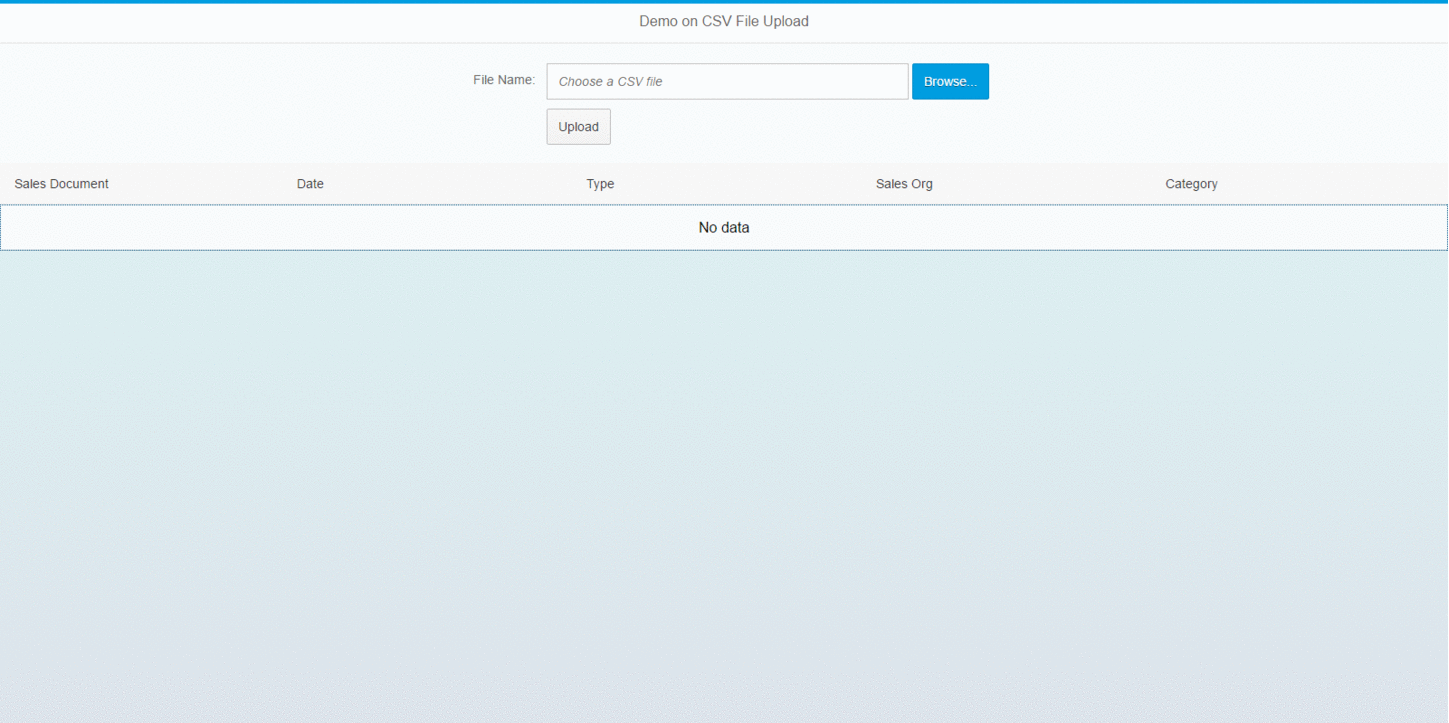
<Page title="Demo on CSV File Upload">
<content>
<l:SimpleForm editable="true">
<l:content>
<Label text="File Name">
</Label>
<VBox>
<u:FileUploader id="idfileUploader" width="50%"
sameFilenameAllowed="false" buttonText="" fileType="CSV"
placeholder="Choose a CSV file" style="Emphasized">
</u:FileUploader>
<Button text="Upload" press="onUpload"></Button>
</VBox>
</l:content>
</l:SimpleForm>
<Table id="idTable" items="{/}">
<items>
<ColumnListItem>
<cells>
<Text text="{VBELN}"></Text>
<Text text="{ERDAT}"></Text>
<Text text="{VBTYP}"></Text>
<Text text="{TRVOG}"></Text>
<Text text="{AUART}"></Text>
</cells>
</ColumnListItem>
</items>
<columns>
<Column>
<Text text="Sales Document"></Text>
</Column>
<Column>
<Text text="Date"></Text>
</Column>
<Column>
<Text text="Type"></Text>
</Column>
<Column>
<Text text="Sales Org"></Text>
</Column>
<Column>
<Text text="Category"></Text>
</Column>
</columns>
</Table>
</content>
</Page>
</core:View>
4. Lets see what we have done in the previous step.We created the view to show File Uploader, Button and Table UI control.
5. Go to FileUpload.controller.js file and copy the below code.
sap.ui.controller("fileupload.FileUpload", {

    onUpload : function(e) {

	var fU = this.getView().byId("idfileUploader");
	var domRef = fU.getFocusDomRef();
	var file = domRef.files[0];


	// Create a File Reader object
	var reader = new FileReader();
	var t = this;

	reader.onload = function(e) {
	    var strCSV = e.target.result;
	    var arrCSV = strCSV.match(/[\w .]+(?=,?)/g);
	    var noOfCols = 5;

	    // To ignore the first row which is header
	    var hdrRow = arrCSV.splice(0, noOfCols);

	    var data = [];
	    while (arrCSV.length > 0) {
		var obj = {};
		// extract remaining rows one by one
		var row = arrCSV.splice(0, noOfCols)
		for (var i = 0; i < row.length; i++) {
		    obj[hdrRow[i]] = row[i].trim()
		}
		// push row to an array
		data.push(obj)
	    }

	    // Bind the data to the Table
	    var oModel = new sap.ui.model.json.JSONModel();
	    oModel.setData(data);
	    var oTable = t.byId("idTable");
	    oTable.setModel(oModel);
	};
	reader.readAsBinaryString(file);
    }
});
6. The above code inside onUpload event handler will read the data from the CSV file and bind the data to the Table.
You have successfully created a SAPUI5 application to load the data from CSV file. Please stay tuned to us for more SAPUI5 Tutorials.


 in SAPUI5")


Comments are closed.